
 |
| Beginner Quilt Along: Binding the Quilt |
To make it easier to follow, this week has been separated into four parts:
- Prepare the quilt
- Prepare the binding
- Attach the binding
- Secure the binding
To complete your quilt, you will need:
- Your quilt top
- Walking foot
- Binding fabric
- Rotary cutter, mat and ruler (or scissors and a ruler)
- Thread
Prepare the Quilt
Remove the excess batting and backing fabric from your quilt. You want to avoid cutting off too much of the quilt top. You may wish to square it up a little, but if you lose too much, it will make the outside squares too small. It's not as noticeable on this particular type of quilt, but once you start working with triangles and stars you could accidentally chop off your points.
 |
| Excess batting and backing fabric. |
 |
| Don't remove too much of the quilt top. |
 |
| Quilt trimmed and ready to bind. |
Sew a 1/8'' seam around the edge of the quilt. This isn't necessary, but it can help keep everything in place when sewing the binding. These stitches will be hidden by the binding.
 |
| Sew a 1/8'' seam. |
Prepare the Binding
Note: For this tutorial I have added extra length to the binding requirements. This is to allow for issues that commonly arise when learning to bind a quilt. You will eventually find a length that works best for you.
Start by giving your binding fabric a good iron to remove any wrinkles.
Cut five 2.5'' width of fabric strips. This means you want to cut from the selvedge on one side all the way across to the selvedge on the other side.

This really is best done with a rotary cutter and ruler, but, I understand that it's not always possible to race out and buy all the groovy tools the minute you start a new hobby. You can cut your strips with scissors, however, you need to be as accurate as possible. The most important part is that your strips are all the same width. If using scissors, use a ruler and pencil (or whatever fabric marker you use) to mark clear lines before cutting.
Remove the selvedges.

We will be making continuous binding by sewing each strip together with a diagonal seam. This is a less bulky and obvious join than a straight seam. Don't worry, it's easy to do.
Take two strips and place them side by side, along the short edge, with the right sides facing up.
 |
| Place two strips side by side. |
Rotate the right hand strip so that it is at right angles with the left hand strip. Then turn it over so it is laying on top of the left hand strip, with the right side facing down. You should now have an L shape with the right sides together.
 |
| Create an L shape with right sides together. |
Position the strips so there is a little overlap. I use a ruler to keep the strip straight and offset them about 1/4'' inch.
 |
| Offset the strips slightly |
Draw a diagonal line from top left to bottom right. Pin the strips in place.
 |
| Draw a diagonal line. |
Sew along the line.
 |
| Sew along the line. |
Open the strips and check that they are even. Sometimes you need to finger press the seam open to check properly.
 |
| Open the seams to check that they are straight. |
Close the seam back up and remove the excess fabric by cutting 1/4'' from the line.
 |
| Remove the excess fabric. |
Remove any extra little bits.
 |
| Remove an little ears too. |
 |
| Nice even binding |
Continuing sewing the remaining strips in this fashion until you have one very long binding.
Press each of the seams open.

Fold and press the binding in half, wrong sides together and raw edges lined up.


Starting on one edge, place the binding with the raw edges lined up to the raw edges of the quilt. The binding will sit on the quilt as pictured below. Leave a long tail, 7-8'', and pin the starting point.
 |
| Pin the starting point, leaving a long tail. |
 |
| Loosely lay the binding around the quilt. |
 |
| Two long tails. |
 |
| Place a pin 10''-12'' from the starting pin. |
Roll up the binding so it is easier to handle, leaving the start pinned in place.

Attach the Binding
Starting at the pin, sew a 1/4 '' seam around the edge, leaving the long tail free.

Stop sewing 1/4'' before a corner.
Note: For mitred corners, you need to stop before the corner at a distance equal to the seam allowance being used. In our case, we're using a 1/4'' seam allowance so we need to stop 1/4'' from the end. If you change your seam allowance, you need to change this stopping distance too.

 |
| Remove the quilt from the machine. |
Fold the unattached binding up so that it is in line with the edge of the quilt. Finger press the diagonal seam.
 |
| Fold the binding up. |
Holding the first fold in place, fold the binding back down so that it is running along the next edge of the quilt.
 |
| Fold the binding back down. |
You should now have a neat, square-looking corner with a few layers of folded binding underneath.
Pin the layers in place.
 |
| Pin the corner in place. |
Start sewing the next side using a 1/4'' seam allowance.
 |
| Start sewing the next side. |
Your mitred corner will look like this.
 |
| Sewn mitred corner |
 |
| Mitred corner opened slightly. |
Continue attaching the binding until you reach the finishing pin, about 10''-12'' from the start. Stop and remove the quilt from the machine.
We are now going to close the binding in a method similar to our continuous binding technique. This leaves a beautifully smooth seam and looks great.
Overlap the two tails, making sure they're sitting neatly along the edges of the quilt, as if they were sewn in place. Draw a line at 2 3/4'' of overlap. This is the width of the binding plus a 1/4'' seam allowance.
 |
| Overlap the tails and draw a line at 2 3/4''. |
 |
| This picture is just to show the overlap. |
Cut off the extra binding at the overlap line.
 |
| Remove the excess binding at the overlap line. |
Open the left hand binding and place it flat on the table.
 |
| Unfold the binding. |
Place the right hand side in the same L shape you used for the continuous binding, including an overlap of 1/8'' - 1/4''.
Note: If you're finding this fiddly, try unpicking some binding to give yourself longer tails to work with. You may also find that folding the quilt makes it easier to get the tails meeting nicely.
 |
| Create an L shape, as with the continuous binding. |
Place a pin along the diagonal, in the place where you would sew.
 |
| Place a pin where you intend to sew. |
Close the binding and make sure it will fit neatly. If it is too loose or tight, you may need to change the overlap in your L shape. I used 1/4'' and it fit perfectly.
 |
| Check that the binding will fit before sewing. |
If you're comfortable with your positioning, draw a diagonal line from the top left to bottom right.
 |
| Draw a diagonal line. |
Pin the fabric together and sew along the line.
 |
| Pin and sew. |
Note: It's not a bad idea to double check that your binding is still going to fit before making this final cut.
 |
| Remove the excess fabric. |
Finger press the seam open and fold the binding back in half.
 |
| Finger press the seam and fold the binding in half. |
Sew the unattached binding to the quilt, using a 1/4'' seam.
 |
| Sew the remaining unattached binding. |
Your binding should now be completely attached to the front of the quilt.
 |
| Binding completely attached. |
Secure the Binding
You can secure the binding to the back of your quilt by machine or by hand. Personally, I much prefer hand sewing the binding. I like the look and find it a less fiddly technique. Machine sewing is perfectly acceptable though, so use the one that appeals to you.
Open the binding so that it is visible from the back of the quilt.
 |
| Open the binding |
 |
| Flip the quilt over. |
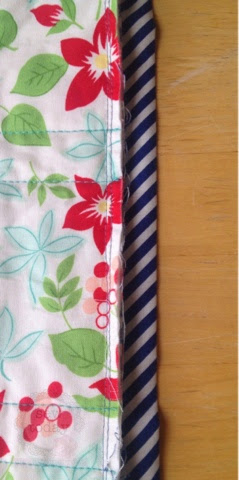
Fold the binding down so that it is positioned a few millimetres past the seam line. Your seams should be covered by the binding.
 |
| Cover the seam with the binding. |
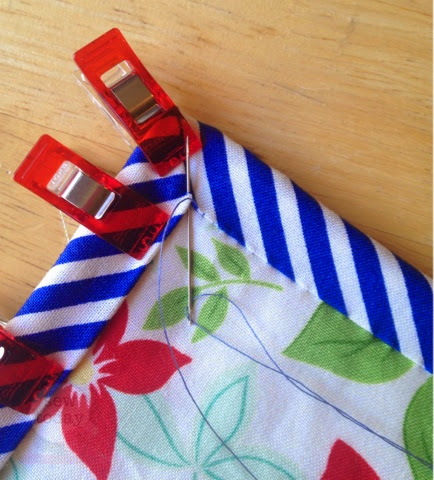
Pin or clip the binding in place. If you're hand sewing, you just need to secure a few inches at a time. If you're using a machine, pin one entire side.
 |
| Binding secured using Clover Wonder Clips, |
 |
| Binding pinned along seam line on the front... |
 |
| ...and catching the binding on the back. |
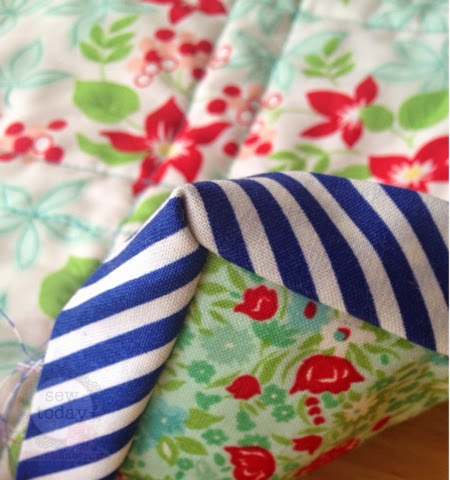
When you reach the corner, it should look like this from the front...
 |
| The mitred corner from the front. |
...and this from the back.
 |
| The mitred corner from the back. |
To pin it in place, fold down the first side.
 |
| Fold one side. |
Fold the other side over the top...
 |
| Fold the second side. |
...to create a corner. Reposition until the diagonal fold sits neatly.
 |
| One mitred corner. |
 |
| Secure the corner. |
 |
| Machine sew along the seam line. |

Ladder Stitch
I love this stitch as it's almost invisible, but, it can be a bit of a slower process.
Take the needle through the fold of the binding, for about 1/8''-1/4''. Make sure the stitch is hidden in the binding and not visible on the outside.
 |
| Stitch in the binding fold. |
 |
| Stitch in the quilt forming a ladder. |
Every few stitches, pull the thread to close the gap.
 |
| Pull the thread to close the gap. |
Slip/blind stitch
A quicker stitch is a slip/blind stitch. This may be a slight variation of a true slip or blind stitch, so feel free to research further if you're after the traditional methods for these stitches.
Take the needle through the quilt, then up through the fold of the binding, but only catch a few threads. If you catch right on the fold, or slightly underneath, the stitches will be less visible. It's very similar to the ladder stitch except you only catch the fold rather than travel through it. I do find this stitch easier than the ladder as you can do it in one fluid motion.
 |
| Catch the binding. |
In reality, you can use any stitch you like. The aim is to make the stitches as invisible as possible, while keeping the binding securely attached to the quilt.
When hand sewing, I like to sew closed the corners of the binding on the back of the quilt. It just feels stronger to me. When I reach a corner, I simple stitch up the diagonal fold and back down again, keeping the stitches invisible.
 |
| Insert the needle at the corner. |
 |
| Sew up to the edge... |
 |
| ...and back down again. |


 |
| Quilts are great for Hide and Seek. |
Don't forget to post your photos on Facebook and Instagram using #fantasticquiltasticadventure and #sewtodaycleantomorrow.
You're now ready for the big old world of quilting. You could even use what you have picked up in the past four weeks for one of these projects.
Super Easy Jelly Roll Quilt
Quilted Cushion Cover
Thanks for joining the Beginner Quilt ALong. I hope you've enjoyed it as much as I have. I'm looking forward to seeing you all for my next adventure. Until then...Happy Quilting xx
 |
| Super Easy Jelly Roll Quilt |
 |
| Quilted Cushion Cover |
Gosh I am so thankful for this post! I use it every time I bind something!! Thanks Rachael :-)
ReplyDelete