

Tutorial Three: The Tiered Skirt

Welcome to the third and final tutorial
of Pretty Skirts All in a Row.
This tutorial will expand on the previous two: The Blank Canvas Skirt and The Simple Border Skirt. As always, use the techniques that you are most comfortable
with. I am simply providing you with alternatives. Remember, if
you use a different technique, you may need to adjust the
measurements when cutting your fabric.
In this tutorial we will:
- Reduce the size of the waistband;
- Add a fuller, gathered skirt; and
- Add elastic in a single step.
NOTE: During this tutorial, I have
assumed that you have either completed the other two tutorials or have some basic sewing skills. Please don't hesitate to
ask, if you find any of the steps unclear.
What you will need:
- Waistband fabric, sized to cover the dimensions discussed below.
- Skirt body fabric, sized to cover the dimensions discussed below.
- Border fabric, sized to cover the dimensions discussed below.
- 3/4'' Elastic, sized to fit comfortably around the waist, with half an inch of overlap.
- Thread.
- A standard zipper foot. This is only required if you want to try the new elastic casing technique.
The first step is to find the
dimensions of the skirt. These are the ratios I prefer for my
daughter, Pepper, who is a slim, 21 month old, ratbag. Her waist
measurement is 19'' and the finished skirt length will be 9''. Adjust
the measurements accordingly.
Waistband
- In the previous tutorials, I was using Pepper's waist measurement for the width of each piece (19''). For this skirt, I like a slightly narrower waist so will take off 5'' to make a waistband width of 15''.
- The length will be 1/3 of the total skirt. For my skirt, the waistband will have a finished length of 3''.
- Add allowances for the elastic casing and joining the waistband to the body of the skirt. I will add 1'' for the elastic casing and 3/8'' for the body seam, giving a total waistband length of 4 3/8''.
Skirt Body
- The skirt body needs to be wider than the waistband to obtain a nice gathered, full skirt. I have added 10'' to my waistband width to give my skirt body pieces a width of 25'' each. Add more if you're after a fuller skirt.
- The length of the skirt body is 3/4 of the remaining length. My remaining length is 6'' (total length 9'' - waistband length 3''). 3/4 of 6'' gives a finished length of 4.5''.
- Add allowances for joining to the waistband (3/8'') and the border piece (1/4'') and the total length becomes 5 1/8''.
Border
- The border width is the same as the skirt body, 25''.
- The finished length will be what is remaining. E.g. Total length (9'') - Waistband (3'') - Body (4.5'') = 1.5''.
- Add allowances to join to the skirt body (1/4'') and for the hem (1''), giving a total length of 2 3/4''.
Cut TWO (2) rectangles, of each fabric,
using your waist and length measurements.
 |
| Waistband: 15'' x 4 3/8'' (TWO pieces cut) Skirt Body: 25'' x 5 1/8'' (TWO pieces cut) Border: 25'' x 2 3/4'' (TWO pieces cut) |
Attaching the Skirt Body to the Border
With right sides together, pin a border to the bottom of each skirt body piece.
 |
| Border pinned to skirt body |
Sew together, using a 1/4'' seam.
 |
| Sew border to skirt body |
Overlock the seam to neaten the raw
edges. If you do not have an overlocker, use your sewing machine
overcasting foot, or leave the edges raw.
 |
| Overlock the seam |
Press the seam towards the border
fabric.
 |
| Press the seam |
This step is entirely optional.
Sometimes I like the look of it, others I just leave it out.
Stitching close to the edge, finish the border by sewing the seam
down.
 |
| Stitch close to the edge |
 |
| The border seam is stitched down |
With right sides together, pin ONE side seam only of the skirt
body. Remember to match the border seam.
 |
| Match the border seam |
 |
| Pin only ONE side seam |
Sew, using a 3\8'' allowance. Take care to keep the border seam in place.
 |
| Sew the seam, ensuring the border seam stays in place |
Overlock the side seam.
 |
| Overlock the side seam |
Press the side seam.
 |
| Press the side seam |
Repeat the previous steps for ONE side seam of
the waistband
 |
| Pin, sew, overlock and press one side seam of the waistband |
You should now have two pieces of
fabric, a waistband and a skirt body. Each will have only one of
the side seams sewn.
Gathering and Attaching the Skirt Body
The next step is to create a fuller skirt by gathering the fabric before attaching it to the waistband. There are many different ways of gathering,
including both manual and automated techniques. I will show just one
here, but, I encourage you to search for other methods and find the
one you are most comfortable with.
The first step is to increase your
stitch length. I use my maximum stitch length of 5. Make sure you
take note of your regular stitch length first, so you can change it
back later.
 |
| Increase to the maximum stitch length |
We are going to sew
three rows of basting stitches. Do not backstitch at the beginning or
end of each row and make sure you leave a good length of thread that
you can easily grasp to make gathering easier. You will see what I mean by
this in the images below.
Note: I have spaced my basting stitches
1/8'' apart. You may prefer a wider spacing. If so, add the extra to your
seam allowance when cutting the waistband and skirt body pieces.
 |
| Sew your first basting row 1/8'' from the edge. Do not backstitch at the beginning or end. |
 |
| Sew your second basting row 1/8'' from the first. |
 |
| Sew your final basting row 1/8'' from the second. |
 |
| You will now have three rows of basting. |
Now, before you forget, change the stitch length back to the normal length.
 |
| Change the stitch length back. |
Pin the skirt body to the waistband, right sides together, at the side seam that was sewn earlier. This will separate the skirt into two halves and make gathering more manageable.
 |
| Lay the skirt body on top of the waistband, right sides together, matching the side seams. |
 |
| Pin the seam in place. |
To gather, hold the bobbin threads, of
all three basting rows, and gently push the fabric towards the centre of the
skirt.
 |
| Hold the three bobbin threads and push the fabric towards the centre. This is much easier if you have left a long thread after stitching. |
Keep gathering until this half of the
waistband and skirt body are the same length. Don't worry about
having neat or even gathers at this stage.
 |
| Gather the first half until the waistband and skirt body are the same length. |
Pin the edges together and secure the thread around the pin in a figure of eight. This will stop the fabric from losing its gathering.
 |
| Pin the edges and secure the threads. |
Evenly distribute the fabric between the pins. Don't worry if you find this part a little fiddly at first. I like to use my finger and thumb to roughly distribute the fabric, then I gently scratch along the surface with my fingernail, spacing the gathers more evenly. Don't be afraid to move the end pin if the gathered skirt body is too long or short.
Once you are happy, pin that half in place. Use as many pins as you need. The more the merrier.
 |
| Distribute the fabric evenly and pin in place. Use as many pins as needed. |
Repeat the gathering for the other half.
 |
| Both halves have been gathered and pinned in place. |
Sew the gathered skirt to the waistband, just outside of the basting stitches, using approximately a 3/8''
seam.
Note: There are methods that sew between the last two basting stitches and then remove the row that is visible. I find this technique results in beautiful gathers, but, some fabrics may end up with holes where the basting stitches were. The best thing to do is practice on your fabric first and see which technique you would prefer to use.
Note: There are methods that sew between the last two basting stitches and then remove the row that is visible. I find this technique results in beautiful gathers, but, some fabrics may end up with holes where the basting stitches were. The best thing to do is practice on your fabric first and see which technique you would prefer to use.
 |
| Sew the skirt body to the waistband, on the outside of the basting stitches. |
Overlock the seam to neaten the raw edges.
 |
| Overlock the seam. |
 |
| The gathered skirt is attached to the waistband. |
Press the seam towards the waistband.
 |
| Press the seam. |
 |
| Stitch close to the edge to secure the seam. |
With right sides facing, pin the
remaining side seam. Ensure the two seams of the waistband
and border are even.
 |
| Be sure both the waistband and border seams match. |
 |
| Pin the side seam. |
Sew the side seam, using a 3/8''
allowance
Overlock the side seam.

 |
| Sew the side seam. |
Overlock the side seam.
Elastic Casing
For this skirt, I will be
showing you my very cheaty method of sewing an elastic casing using a zipper foot. It's a little more advanced, but, I think it's a great technique to be aware of. If you are
not comfortable with this method, it's not a problem at all. Just use one of our previous
techniques (in The Blank Canvas Skirt or The Simple Border Skirt). These involved pressing, pinning and
sewing the casing down, leaving a gap to the thread the elastic.
You may need to practice this technique
a few times before you are comfortable with it. I know I did, but, now I
love it. I'm particularly fond of it if I'm just whipping up Pepper a
skirt for home and want to take as many shortcuts as possible.
Basically, we are going to sew the casing around the elastic, using a zipper foot to keep everything in place.
First, overlock the waistband to neaten
the raw edges.
 |
| Overlock the waistband. |
Using the elastic as a guide, press the casing down. You don't need to leave too much extra space. I line up the elastic with the top edge and the top of the overlocking stitches.
 |
| Press the casing down, leaving enough space for the elastic and stitches. |
Sew your elastic ends together to form your waistband. This is a great opportunity to try it on and make sure it's the right size.
 |
| Sew the elastic ends together. |
 |
| The sewn elastic waistband. |
Attach your zipper foot. You may be able to use a different foot, but I find the zipper foot is great for keeping the elastic away from the needle.
 |
| The zipper foot. |
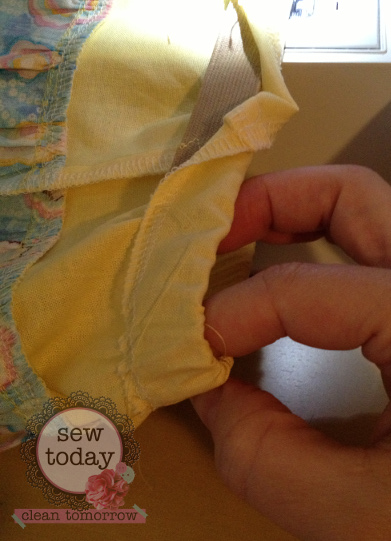
With the skirt inside out (i.e. wrong side facing you), slip the elastic over the skirt and sit it in the casing you have pressed down. It doesn't have to be perfect. Near the casing is fine.
 |
| Slip the elastic over the skirt, into the pressed casing. |
Pin one seam down, with the elastic inside, to ensure the seams are straight when you start sewing. The rest of the elastic can just sit in or near the casing. It will fall into place as you sew.
 |
| Pin one seam down. |
Slide the skirt onto your machine
 |
| Slid the skirt onto your machine. |
Position the foot just after the side seam pins.
Use your finger to push to elastic against the top edge of the
casing, while using your overlocking as a guide for stitching in a straight line. Do not
catch the elastic in your stitches. The zipper foot should help keep the needle away from the elastic.
 |
| Starting after the side seam pins, use your finger to push the elastic against the top edge of the casing and away from the needle. |
 |
| Start sewing slowly. You can see how close the stitches are without actually catching the elastic. |
You may feel like you need octopus hands,
but you will get used to it after a while. The key is to go slowly and just focus on the inch or two directly in front of the needle. Take
your time and be comfortable with each stitch you make.
Keep using your finger (fingernails
work great) to keep the elastic snug against the top edge of the
casing.
 |
| Use your fingers to keep the elastic snug against the casing. |
After you have sewn a few inches,
remove the seam pin you had in place. This will allow the elastic to move.
 |
| Remove the seam pins. |
As you sew, you will find that
you start running out of elastic. When this happens, loosely hold the fabric
behind the foot, with one hand and with the other, gently pull the elastic towards you, in front of the foot, so you have
more to work with. I find myself doing this every couple of inches.
 |
| Hold the fabric behind the foot with one hand. |
 |
| Gently pull the elastic towards you with the other hand. The fabric behind the foot will start to gather as you do this. |
Keep sewing and adjusting the elastic
as needed.
 |
| Keep sewing and adjusting the elastic. |
Remember to keep the seams even as you come to them
 |
| Keep your seams in line. |
Once you are nearing the start,
you may find that you have excess elastic. Gently pull the fabric to
loosen the gathering around the elastic and allow the opening to lay flat. Continue sewing until the casing is closed
completely.
 |
| Excess elastic when nearing the start of the casing. |
 |
| Gently pull the fabric to loosen the gathering around the elastic. |
 |
| Once the opening is flat, continue sewing it closed. |
Evenly distribute the fabric around the waistband and sew the elastic down in each side seam, as we have in the other tutorials.
 |
| Sew the elastic down to prevent rolling. |
 |
| A beautifully finished elastic casing. |
Hem
NOTE: For this hem I will be using the
overlocker. If you do not have one, simply use the method from the
first tutorial of folding the hem inwards 1/2'' and then another
1/2'' to hide the raw edges.
Overlock the hem and press inwards
1''.
 |
| Press the overlocked hem in 1''. |
Pin the hem for sewing.
 |
| Pin the hem. |
Sew the hem in place, stitching close to the edge.
 |
| Sew the hem in place, close to the edge of the overlocking. |
Sew a second row along the hem, about 1/8'' away from the first row. This is optional, but I love the finished look a double hem gives.
 |
| Sew a second row, about 1/8'' from the first. |
NOTE: You can sew the hem with either
the overlocking facing up or down. Just make sure that both rows are
sewn the same way, otherwise the stitches may look different.
Finally, press your skirt and remove
any excess threads.
Congratulations. You have finished your
tiered skirt
 |
| Finished tiered skirt. |
 |
| Another, using a 13'' waistband and 21'' skirt body. |
 |
| A third using a 13'' waistband and 19'' skirt body. |
This completes our beginner sewing
series, Pretty Skirts All in a Row. I hope you've enjoyed these as
much as I have. Please don't hesitate to ask questions or leave
feedback. I'd love to hear about your projects.

Just caught up with this series. Great Tutorials, thanks :)
ReplyDeleteThanks so much, Caroline :) I'm glad you're enjoying them.
DeleteI can't wait to try this one! The new elastic casing method sounds a little tricky for me, but I going o try it and see how I go. That's the only way to learn, after all ;)
ReplyDeleteMy daughter is loving her skirts, now she wants a dress, but I'm not sure I'm up to that just yet!
Sounds like I'll have to start thinking about dresses ; )
DeleteThe new elastic casing technique is definitely trickier than the last two, but I thought it was a great way to show a different way of doing things. You could even practice on a scrap strip of fabric and some elastic, without sewing the ends together so it's all nice and flat. To start with, give yourself a good gap between the needle and elastic. As you get more comfortable, start sewing closer in until you have a nice, snug casing.
It's not necessarily a technique I always use, but definitely one I turn to if I'm in a hurry and looking for shortcuts. Like you said, the only way to learn is to give it a go. If it's not for you, then no worries. Plenty of other techniques to use instead : )
Great bllog you have here
ReplyDelete