 |
| Beginner Quilt Along |
This week is a little bit of an 'information overload' as I discuss common terms and tools you may come across in the world of quilting. Don't worry, you won't need them all for these tutorials. All requirements will be listed at the end of this post. If you're already familiar with quilting then feel free to jump straight to the end, grab your purse and head out for a shopping spree.
Fabric
I'm sure you've all seen the beautiful selection of quilting cotton in your local store. Soft pastels, bright moderns, novelty prints, there is a style to suit everyone. Prepare to be addicted ; )Quilting cotton can be bought by the yard/metre, in fat quarters or as pre-cuts.
Note: For my fellow Australians, you will notice that quilting terminology is in inches/yards while your local stores may cut in centimetres/metres. Don't fret. I find that, because yards are slightly smaller than metres, it's easiest to just order what the pattern states, but in metres. E.g. if you need 1 yard then order 1 metre. You will simply end up with slightly more fabric in your stash...and that's a win in my books.
A fat quarter is, as the name suggests, a quarter of a yard. It is special, however, in that it is not cut across the width of fabric (WOF), as a quarter yard would be, but is cut at 1/2 WOF and 1/2 yard in length. e.g. 18'' x 22''.
Note: Width of Fabric (WOF) simply means from selvedge to selvedge.
 |
| Fat Quarter Diagram |
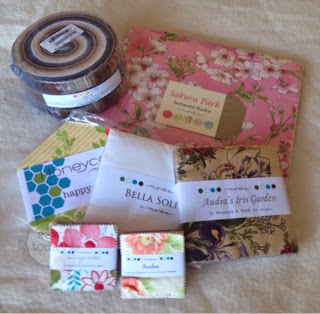
These include:
Layer Cakes: 10'' x 10'' squares
Jelly Rolls: 2.5'' x WOF strips
Charm Squares: 5'' x 5'' squares (we will be using these for our quilt)
There are also mini charms, honeycombs and many more.
Layer Cakes: 10'' x 10'' squares
Jelly Rolls: 2.5'' x WOF strips
Charm Squares: 5'' x 5'' squares (we will be using these for our quilt)
There are also mini charms, honeycombs and many more.
There are usually around 42 pieces in a pre-cut pack, but this is not always the case so be sure to read the label first.
Where do you buy pre-cuts? There are many online or bricks and mortar stores that stock pre-cut fabric. If you're having trouble finding some, please ask in on our Facebook group the Fantastic Quiltastic Adventure and the other participants will help direct you to their favourite stores.
Do I have to use Charm Packs for this quilt?
No, of course not. You're more than welcome to buy yardage and cut your own 5'' squares. Charm packs are a great way for a beginner to sample quilting without being overwhelmed with buying extra tools and the stresses of accurate cutting.
Do I need to pre-wash my fabric?
I don't recommend washing pre-cuts as they are quite small and may fray or distort. I've not had a problem with colours running or shrinkage.
Backing Fabric
You can use any fabric you like for the backing, however, if this is your first time quilting, I highly recommend sticking with a quilting cotton. Minky and fleece are lovely, but, they can stretch and be difficult to work with. Let's try and keep this learning process as easy as possible : )There are extra wide fabrics available, usually 108'' wide, that can be used as backing fabric. These will not be necessary for this tutorial but are definitely worth knowing about.
Binding
The binding is the beautiful edging that finishes your quilt. You might choose the same fabric as the backing, something from the quilt front, or even a contrasting fabric to really bring the quilt to life.
Batting
Batting is that snuggly, warm centre of the quilt and comes in so many varieties. Cotton, Wool, Bamboo, Poly blends, the list goes on. It will really come down to what you like to work with and where the quilt is going. Does it need to be extra warm? Wool might be a good choice. Is it for a baby? Cotton might be Mumma's preference.Batting can also come in pre-cut bags with sizes suitable for cots, single beds, queen beds etc.
I recommend talking to your local store about what you need. Stock may differ from store to store. E.g. my local quilting store only stocks a wool/cotton blend, but that suits me perfectly.
Tools
Rotary cutter, self healing mat, rulers.
One of the first sets of tools you will probably buy for quilting, though not needed for this tutorial, is a rotary cutter, self-healing mat and a ruler.
 |
| Rotary cutters, rulers and a self healing mat |
You will also find available a wide range of fancy tools and templates, but we won't go into those.
Sewing Machines
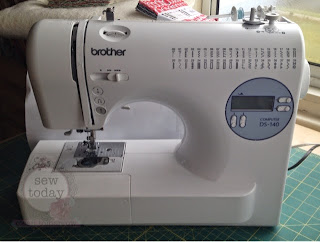
There are some super duper fancy sewing machines designed for quilting...none of which you need to complete this tutorial. Your domestic machine should handle the piecing and quilting without issue. As much as we'd all love to rush out and buy a new machine, I'd probably recommend making a quilt or two first to help you decide what you need (I know, I know...party pooper).
There are some super duper fancy sewing machines designed for quilting...none of which you need to complete this tutorial. Your domestic machine should handle the piecing and quilting without issue. As much as we'd all love to rush out and buy a new machine, I'd probably recommend making a quilt or two first to help you decide what you need (I know, I know...party pooper).
 |
| This little guy has seen me through many a quilt. |
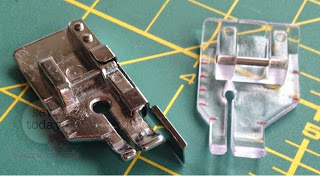
There are a few feet available that can help with piecing. The main two I use are the 1/4'' with guide and 1/4'' without guide. Both are used to help maintain a consistent 1/4'' seam. You will not need these for this tutorial. All you need is to find the 1/4'' mark on your machine. If you can't find one, mark your own with a pen, post it note, rubber band or something else to guide you.
Note: Generally with piecing, accuracy is really important. For this particular quilt, as long as your seams are consistent, you should be able to match your joins neatly. Don't stress too much over obtaining the perfect 1/4'' at this stage.
For the quilting in week two, you will need a walking foot.
This crazy looking device will help feed all the layers of the quilt evenly through your machine. It can be used for quilting straight lines or long, easy curves. If you don't already have one, you will need one for the quilting in this quilt along. They're also great for sewing with difficult fabrics like minky or knits, so it won't go to waste.
Another foot for quilting is the free motion quilting foot (also known as a darning foot).
Another foot for quilting is the free motion quilting foot (also known as a darning foot).
You won't need one, but they're super-cool and worth mentioning. These little critters allow you to do all sorts of gorgeous designs on your quilt. You know all those pretty swirls, flowers, waves, etc? That's free motion quilting. A lot of people are terrified of free motion quilting and avoid it like the plague. It really isn't difficult or scary. Like with anything, a few practise sessions and you'll be ready to go. Don't be afraid to try new things...you never know where it might take you.
Note: If you would like to know more about free motion quilting, Google search 'Leah Day'. Leah is a free motion whizz and an amazing teacher. You won't be disappointed.
Note: If you would like to know more about free motion quilting, Google search 'Leah Day'. Leah is a free motion whizz and an amazing teacher. You won't be disappointed.
Needles
I'm not really all that fussy with needles and tend to use either a size 75/11 or 90/14 for both piecing and quilting. This is just personal preference and you may find your machine, thread and fabric combination requires a different size. Read your manual to see what it suggests. Otherwise, for piecing, use whatever you normally use for sewing and for quilting, use what you would for thicker fabrics.
Thread
 |
| Yummy |
You can even have different threads for the quilt top and the backing, however it's a lot more important to have correct tension if you do this, otherwise you may have thread showing through onto the opposite side.
Other fun toys
Here are just a few more little toys that I like to use for my quilts:
Here are just a few more little toys that I like to use for my quilts:
Clover Wonderclips
 |
| Clover Wonderclips |
Quilting/piecing Pins
 |
| A variety of handy pins for quilting |
Basting spray
One method for basting the quilt (temporarily joining the front, batting and back...we will go through this more in week two) is to use basting spray.
It's a glue like substance that holds each layer in place when quilting. I'm a huge fan of basting spray and have found that, with smaller items, I haven't even needed to pin. It really helps prevent any puckering or tucks on the back of the quilt.
Curved/bent safety pins
Curved/bent safety pins
Another method for basting the quilt are these bent, or curved, safety pins. These allow you to easily pin through the front, back and to the front again without fiddling around with each layer.
This brings us to the end of our introductory tutorial. It's been a lot of information, I know, but hopefully it has given you some insight into the world of quilting. The following is a clear list of what you will need for your quilt and the week in which it is needed.
What You Need
The finished quilt will be approximately 36'' x 45'' and you will need:
Week One: Piecing the Quilt Top
- 80 x 5'' squares, or two standard charm square packs.
- Sewing pins
- Thread and needle for piecing
Week Two: Quilting, Quilting, Quilting
- 1.5 yards backing fabric. This will cover the quilt top with a few inches on each side to account for movement during quilting.
- Walking foot
- At least 40'' x 49'' Batting. As with the backing fabric, you want a few inches extra around the edges of the quilt top to allow for movement when quilting.
- Curved pins and/or basting spray
- Thread and needles for quilting
Week Three: Binding and Finishing the Quilt
- 1/2 yard of fabric for binding..
What Next?
Your homework for the next two weeks is to purchase your fabric, clean your machine and put in a shiny new needle in preparation for the next tutorial...Piecing the Quilt Top.
Don't forget to post photos of you fabric choice in the Fantastic Quiltastic Adventure Facebook group and on Instagram using the hashtags #fantasticquiltasticadventure and #sewtodaycleantomorrow.


No comments:
Post a Comment