

Tutorial Two: The Simple Border Skirt

This tutorial will see us expand on the
Blank Canvas Skirt, from the last tutorial and begin adding a little flair to our
skirts. You will notice that the steps are almost identical, so, I have added a few new techniques, using
an overlocker. Don't worry if you don't one. You can still make the
skirt using the steps from the previous tutorial. I just thought it
would be fun to show similar results using different methods. After
all, there's nothing wrong with having a few extra tricks up your
sleeve.
In this tutorial you will learn:
- How to add a border, of a different fabric, to your skirt;
- A new technique for elastic casings; and
- A new technique for hems.
NOTE: During this tutorial, I have
assumed that you either completed the Blank Canvas Skirt or
have some basic sewing skills already. Please don't hesitate to ask,
if you find any of the steps unclear.
What you will need:
- Main body fabric, sized to cover the dimensions we will discuss below.
- Border fabric, sized to cover the dimensions we will discuss below.
- 3/4'' Elastic, sized to fit comfortably around the waist, with half an inch of overlap.
- Thread.
Making your skirt:
The first step is to find the
dimensions of the skirt.
- Measure all the way around your waist. This will be your width measurement. Mine is 19 inches. Well, my daughter's is, anyway.
- To determine the lengths of the main body fabric and border fabric, start with the total length of the finished skirt. Measure from the waist to where you want the skirt to finish. In my example, the total length is 9 inches. I make the border 1/3 of the total skirt, so my border fabric finished length is 3 inches. This leaves the main body fabric finished length of 6 inches.HINT: 'Finished length' means the length after the seams, hem and elastic casing have been sewn.
Next, you need to add seam, hem and
elastic casing allowances.
- To the main body fabric length, add 1'' for the elastic casing and another 1/4'' for the seam joining the border fabric. E.g. 6'' finished length + 1'' casing + 1/4'' border seam = 7 1/4'' total lengthNOTE: If you are not using an overlocker, you may wish to add another 1/2'' to the elastic casing for folding under the raw edge.
- To the border fabric length, add 1'' for the hem and 1/4'' for the seam joining to the body. E.g. 3'' finished length+ 1'' hem + 1/4'' body seam = 4 1/4'' total length.
Cut TWO (2) rectangles, of each fabric,
using your waist and length measurements.
 |
| Main Body Fabric: 19'' x 7 1/4'' (Two pieces cut) Border Fabric: 19'' x 4 1/4'' (Two pieces cut) |
Attaching the Main Body to the Border
With right sides together, pin the
border to the bottom of the main body piece.
 |
| Border pinned to main body piece |
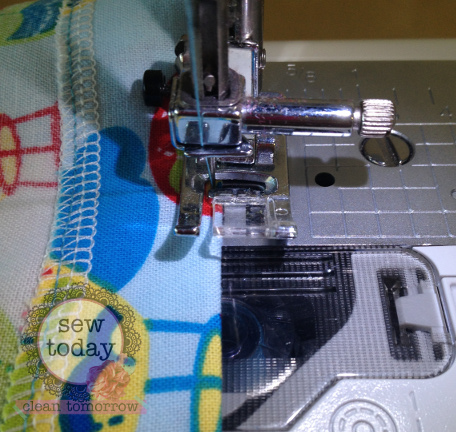
Sew the pieces, using a 1/4'' seam. You will see in my photo that I have cheated
by using a 1/4'' piecing foot with guide. This isn't necessary. Just one of the many tools available.
 |
| Sew border using a 1/4'' seam |
Overlock each seam to neaten the raw
edges. If you do not have an overlocker, use your sewing machine
overcasting foot, or leave the edges raw.
 |
| Overlock the border seam |
 |
| Border seam after overlocking |
Press the seam towards the border
fabric. I like to give it a quick press closed first. Then, with the border piece facing me,
I use the iron to gently open the fabric, keeping the seam against
the border.
 |
| Give the seam a quick press closed first |
 |
| Using the iron, gently open the fabric, keeping the seam against the border |
Finally I press the seam both front and
back. This might seem like overkill, but I find it opens the seam
nicely and stops getting little tucks in the fabric.
 |
| Press the front of the seam |
 |
| Press the back of the seam |
This next step is entirely optional.
Sometimes I like the look of it, other times I just leave it out. It's really a matter of your own personal style.
Stitching close to the edge, finish the border by sewing the seam
down.
 |
| Stitch close to the edge. You should be catching the seam underneath. |
With right sides facing, match the
border seam joins on the two skirt pieces. I find this easiest by
using one pin to align the two joins, then placing pins on either
side of this.
 |
| Use a single pin to align the border seams |
 |
| Add a pin to either side to keep the seam in place |
Continue to pin the rest of the side
seams.
 |
| Side seam pinned |
Sew the side seams, using a 3/8'' allowance. When you reach the border seam, take care not to move the fabric. I find it easiest to just stitch very slowly, leaving the pins in until the last minute. Then I use my finger to hold the seam in place until I have stitched past it.
 |
| Sew the side seam, using a 3/8'' allowance |
 |
| When you reach the border, sew slowly and leave the pins in until the last moment |
 |
| Use your finger to keep the border in place until it is sewn |
Check that your seams have aligned neatly.
 |
| Neatly aligned border seams |
Overlock each side seam to neaten the raw
edges. If you do not have an overlocker, use your sewing machine
overcasting foot, or leave the edges raw.
 |
| Overlocked side seams |
Press the side seams. This makes stitching the elastic casing and hem easier. I like
to press from the front first and then again from the back, making sure
there are no tucks in the fabric.
 |
| Pressing the side seam from the front |
 |
| Pressing the side seam from the back |
Elastic Casing
NOTE: For this elastic casing, I will
be using the overlocker. If you do not have one, simply use the
method from the previous tutorial of folding the top inwards 1/4''
then again 1'' to hide the raw edges.
Overlock the top edge of the skirt. Make sure the side seams lie flat.
 |
| Overlock the top edge, ensuring the seams are flat |
Fold the top inwards 1''. You can
either measure this, or just use the elastic as a guide,
ensuring you leave enough room to stitch the casing down.
 |
| Use your elastic as a guide for sizing the casing |
Press and pin the
elastic casing in place, remembering to leave a gap for threading the
elastic.
 |
| Ensure your seams are lined up |
 |
| Remember to leave a gap to thread your elastic |
With the overlocked edge facing you,
sew the elastic casing, leaving the gap open. I like to use
the overlocking stitches as a guide to make sure I'm sewing straight.
 |
| Use the overlocking to guide your stitches |
Stitch along the entire top edge of the
casing, as close to the edge as possible. This step is optional. I
just like the finish it gives the casing.
 |
| Stitch along the top edge of the casing for a neat finish |
Thread the elastic and make sure it hasn't
twisted.
 |
| The elastic has been threaded |
Overlap the ends of the elastic 1/2'' and
sew together using a few lines of zigzag stitch.
 |
| Sew the elastic together, using a zigzag stitch |
 |
| The sewn elastic |
Sew the gap closed, taking
care to ensure the fabric is flat and even.
 |
| Sew the gap in the casing closed |
Evenly distribute the fabric around the
elastic. At each seam, stitch the elastic down, with a few stitches,
to prevent it from rolling.
 |
| Stitch the elastic down to prevent it from rolling |
Hem
NOTE: For this hem I will be using the
overlocker. If you do not have one, simply use the method from the
previous tutorial of folding the hem inwards 1/2'' and then another
1/2'' to hide the raw edges.
Overlock the hem. Be sure the the side
seams are flat and facing the right direction.
 |
| The seam may be facing away from the overlocker foot |
 |
| Or towards the foot |
 |
| The overlocked hem |
Press the hem inwards 1''.
 |
| Press the hem 1'' inwards making sure the seams are lined up |
Pin the hem for sewing.
 |
| The hem is pinned to prevent the fabric from moving |
Sew the hem in place, stitching close
to the edge.
 |
| Sew the hem in place |
Sew a second row along the hem, about
1/8'' away from the first row. This is optional, but I love the
finished look a double hem gives.
 |
| Sew a second row of stitches 1/8'' from the first |
NOTE: You can sew the hem with either
the overlocking facing up or down. Just make sure that both rows are
sewn the same way, otherwise the stitches may look different.
Finally, press your skirt and remove
any excess threads.
 |
| The finished balloon skirt |
 |
| A cute little retro number |
Congratulations on finishing your first border skirt.
The final tutorial will expand on this
by adding a narrower waist with a gathered skirt. I will even show
you my very cheaty method for sewing an elastic casing. No threading
required!!!
I hope you've enjoyed this tutorial.
Please don't hesitate to ask questions or leave feedback. I'd love to
hear about your creations.
very cute and nice.
ReplyDeleteThis was a fantastic read
ReplyDelete