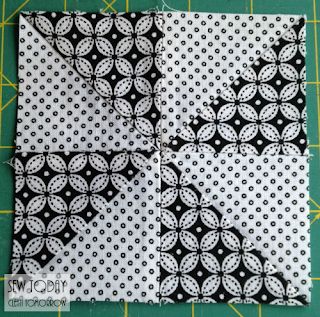
A PDF version of this tutorial, containing diagrams instead of photos, is available in my Craftsy store: Pinwheel Quilt Block PDF Pattern.
 |
| Pinwheel Block |
Cutting Instructions
These instructions are for a Pinwheel block of any size. Two
squares of each fabric, cut to the ‘Cut Size’, are required for a single
Pinwheel block. Use the formula below to determine the cutting size needed.
Cut Size = (Finished
Block width /2) + 1’’
Note: Technically you only need to add 7/8'' instead of 1'', but it's easier to cut a little larger and trim to size later.
Note: Technically you only need to add 7/8'' instead of 1'', but it's easier to cut a little larger and trim to size later.
For example:
If the desired Finished Block is 12’’ (or an unfinished size
of 12 ½’’), then:
Cut Size = (12/2) + 1
=
6 + 1
=
7
Cut two 7’’ squares of
Fabric 1 and two 7’’ squares of Fabric 2.
Piecing Instructions
 |
| Cut two squares of each fabric. |
Use a ¼’’ seam allowance unless otherwise stated.
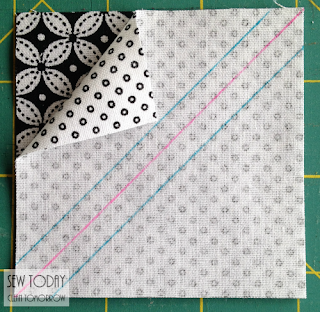
On the wrong side of each Fabric 1 square, draw a line along
one of the diagonals.
Draw another line ¼’’ from either side of the centre diagonal.
Draw another line ¼’’ from either side of the centre diagonal.
 |
| The pink line is the first diagonal you draw. The blue lines are 1/4'' either side of the pink. |
 |
| Place the Fabric 1 and Fabric 2 squares right sides together |
Cut along the centre line, producing two half-square
triangles (HSTs).
 |
| Cut along the centre diagonal (pink line) |
 |
| Two HSTs have been created |
 |
| Open HSTs |
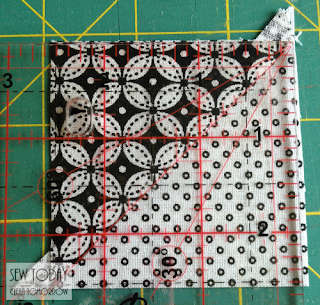
Trim each HST to size. Use the following formula to determine the trim size:
Trim Size = (Finished Block width /2) + 1/2’’
For example:
If the desired Finished Block is 12’’, then:
Trim Size = (12/2) + 1/2
= 6 + 1/2
= 6 1/2''
Hint: Place the 45 degree line of your ruler against the
diagonal seam to ensure the HST is trimmed evenly. |
| Trim HSTs using the 45 degree line as a guide |
 |
| Trimmed HST |
Sew two HST units as shown below, pressing the seam open or
toward the darker fabric.
Repeat for the remaining two HST units.
 |
| Sew two HSTs together |
Join the two units, taking care to line up the middle seam
and keep the points of each triangle.
As you can see, while this is a quick and easy block to piece, it can add a lot of interest to your quilt.
 |
| Sew two units together to make the pinwheel |
I hope you enjoyed this Blockalogue pattern and tutorial. I'd love to hear what you think so please let me know by either leaving a comment below, or on the pattern on my Craftsy page (Pinwheel Quilt Block PDF Pattern).


No comments:
Post a Comment