Today I will demonstrate how to piece a basic quilt top. If you are new here, then you may like to read our introductory post and Fabric, Tools and Other Toys.
You should now have gathered your fabric, cleaned your machine, changed your needle and prepared your favourite sewing music. For this week, you will need your 80 x 5'' squares of fabric, plus thread for piecing.
You should now have gathered your fabric, cleaned your machine, changed your needle and prepared your favourite sewing music. For this week, you will need your 80 x 5'' squares of fabric, plus thread for piecing.
The squares will be placed in ten rows of eight, in a design most appealing to you. I have chosen a random design.
 |
| Place your squares in an 8 x 10 layout. |
Note: When I'm struggling to decide on a layout, I find it helps to take a photo of the various combinations and compare them on my phone. In fact, I strongly suggest taking a photo of your layout anyway, just in case your squares get mixed up before they're sewn together.
Once you have chosen a layout, you need to stack the squares so that they can easily be sewn in order. Some suggestions are:
- Leave them where they are (not helpful if there are little hands/paws around)
- Stack them in a single pile and remember to start a new row after every eighth square.
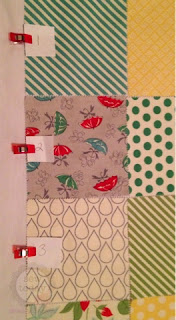
- Pin a number to each row, as I have done here.
I simply hand write the numbers and pin them to to the start of each row. You will see how these markers become useful throughout the tutorial.
 |
| Pin a number to mark each row. |
Once labelled, I gather up the squares from each row.
 |
| First row gathered in order. |
Then I stack the rows in order.
 |
| Squares stacked in order with each row clearly marked. |
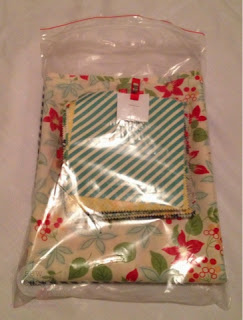
On a side note, if I needed to pop the project aside at this point, I would simply place the stack of squares into a zip lock bag with the backing and binding fabrics, pattern, thread and any other related bits and pieces.
 |
| Keep the project organised in a zip lock bag. |
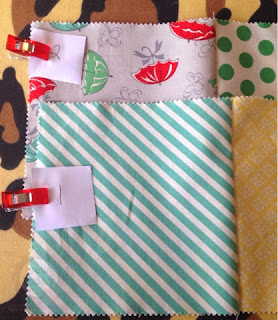
Place the first and second square, of your first row, with the right sides together and raw edges lined up. Depending on your skill level, you may choose to pin the seam. I don't usually bother as the piece of fabric is quite small and easy for me to manipulate by hand.
 |
| Place the first and second squares with the right sides together. |
You will notice that I leave the row marker on the first square. There are two reasons for this. Firstly if, during sewing, I get a bit turned around, I can't accidentally sew to the wrong end of the row. Secondly, I don't have to keep my completed rows in order.
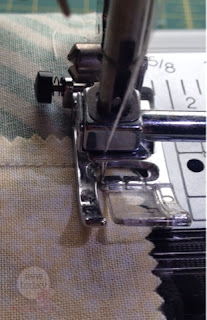
Sew a 1/4'' seam. When piecing, you don't need to backstitch at the beginning or end of a seam, as you would when sewing a garment. I do, however, reduce my stitch length slightly to make the seam more secure.
Note: For this quilt, you don't need to stress too much about a perfect 1/4'' seam. All that is important is that you keep the seams consistent. Find a marking that closely resembles 1/4'' and use that as your guide every time.
Next, sew the third square to the second, remembering to use your 1/4'' seam.
 |
| The first row is starting to take shape. |
Continue until the first row is sewn.
| The first row sewn. |
Next we need to press each seam. You can do this as you go, but I find waiting until the end to be more efficient.
Before we start, here's a little tip with pressing. It's important that you press your seams rather than iron them. What do I mean? With ironing, you put the iron on the garment and, while applying pressure, move the iron back and forth (e.g. Ironing a shirt...if you're someone that actually does that hahaha). This combination of pressure and movement can skew and distort the fabric you're piecing. A more suitable method is to place the iron down, apply pressure and then lift it straight back up before moving it to the next part of the seam. Just like using a stamp. This isn't restricted to quilts either. It is also recommended when sewing garments.
I press my seams in three steps. This may not be necessary, but I find it gives me the best results.
Firstly, press the seam closed (i.e. exactly how it comes off the sewing machine). This sets the seam by smoothing out any puckers or wrinkles and sinking the stitches into the fabric, allowing the seam to be pressed flat.
 |
| First, press the seam closed. |
 |
| Press the seam from the right side |
Finally, turn the fabric over and press the seam from the wrong side. This lets me double check that it is neatly pressed and there are no tucks in the fabric.
|
 |
| Finally, press the seam on the wrong side. |
 |
| All the seams pressed for the first row. |
You need to press the seams of a row in the same direction. Then alternate the direction for each row. For example, press the first row seams towards the start of the row, press the second row seams towards the end of the row, the third row seams towards the start of the row and so on.
This is explained better in the following pictures.
 |
| A close up of the alternating seams. |
Take rows one and two and place them right sides together. Make sure the row markers are at the same end.
You will be sewing these rows together, but, before you pin, double check that you are pinning to the correct side of the seam. You want to sew the top of row two to the bottom of row one. I discovered that it's very easy to accidentally pin to the wrong side and end up with your rows upside down. I also discovered that it's not fun to unpick.
Start by matching the first seams. You will see that they almost lock in to place as they have been pressed in opposite directions.
 |
| See how pressing the seams in opposite directions helps them neatly nest together? |
Personally, I like to use Clover Wonder Clips instead.
 |
| You can also use Clover Wonder Clips. |
Sew the rows together using a 1/4'' seam. It can be daunting having all of those seams to match, but, the best advice I ever received was to simply sew from pin to pin. If you only focus on what's happening between your needle and the next pin, instead of the entire seam, you will have a much more enjoyable time. Here's what I mean...
Sew slowly and stop when you reach the first pin.
Remove the pin and use your finger to hold the seam in place. Make any adjustments necessary. You want your seams nested and the raw edges lined up.
Start sewing slowly and use your finger to hold the seam for as long as possible.
 |
| Use your finger to hold the seam in place while sewing. |
Sew through the seam and stop a few stitches past it, once the seam is secure.
 |
| Stop sewing a few stitches past the seam, once it's secure. |
Continue sewing the seam to the end.
 |
| They can't all be winners. |
This time, I press the seams as I go. I also use the ironing board to prepare by removing unwanted threads and pinning the next row before moving back to my machine.
Remember to first set the seam...
 |
| Press from the right side of the fabric. |
I love watching it grow...
 |
| Looking good. |
And grow...
You've now completed your quilt top. I bet it looks fantastic.
Next week we will tackle the actual quilting. For this lesson, you will need:
Next week we will tackle the actual quilting. For this lesson, you will need:
- Your completed quilt top
- Basting spray and/or pins
- Backing fabric
- Batting
- Thread and needle for quilting
- Walking foot - If your walking foot came with instructions, now would be a good time to read them. If not, don't worry. I will show you how mine attaches so you can see how it's done.
I know a lot of you are probably stressing about the quilting. Maybe you've had some bad experiences, or heard rumours about it being difficult or scary. Fear not. It's really no different to sewing. You simply have a few more layers. I will guide you through each step and you will be quilting like a pro in no time. By the end of next week you will really see your beautiful quilt come to life.
If you have any questions or comments you're welcome to post them here or in our Facebook group. I'd also love to see photos of your quilt tops on Facebook or Instagram using #sewtodaycleantomorrow and #fantasticquiltasticadventure.


Clover wonder clips - worth buying? Never seen them before
ReplyDeleteI think they are. I use them in place of pins for both quilts and garments. Not all the time, but the majority of the time. I have a toddler so I really like not having sharp, pointy pins in reach hahaha. Like with most things, it would come down to your own preference too.
DeleteI believe Birch have a cheaper version but I haven't used them so can't speak for their quality. I've been very happy with my Clover ones.
I have just finished a queen size quilt top and discovered it is not square when I folded it. What do I do to fix this little problem? It's not off by much (about 2" at the edges then it angles off to a point). I hope I haven't confused you. I almost decided to cut it but my strips wouldn't be even.
ReplyDeleteThere are a few options for an uneven top:
Delete* unpick it and check your 1/4'' seam
* leave it as is
* try trimming the uneven areas (though could leave I individual blocks looking funny)
* add a border and square that up so the whole quilt is square
* try pressing/steaming the corner and seeing if the fabric settles back into place (perhaps it's just been stretched a little)
It wil really depend on the purpose of the quilt and how far off it is. For example, if it were me and I'd made it for my own bed, I would just leave it be. It shouldn't really be all that noticeable. If it's for a quilt show, I would unpick and start again.
If you're having it professionally quilted then call your quilter. They may have a preferred method for fixing these sort of issues.
I have a Facebook Group called The Sew Quilty Workshop where you might get some more suggestions from the members. You're more than welcome to join :D
Thank you so much, Rachel. I think I will just leave it since it is for my own bed. I will, however enjoy the workshop. Take care and God Bless.
Delete